Perform the tasks in the following sections - in order, to upgrade the complete OneStream system.
Uninstall OneStream Servers
-
Select Control Panel > Programs and Features > Uninstall a Program and locate the OneStream Servers component.
-
Right-click OneStream Servers and select Uninstall.
Uninstall OneStream Client API
If installed, perform the following steps to uninstall the Client API:
-
Select Control Panel > Programs and Features > Uninstall a Program and locate the OneStream Client API component.
-
Right-click OneStream Client API and select Uninstall.
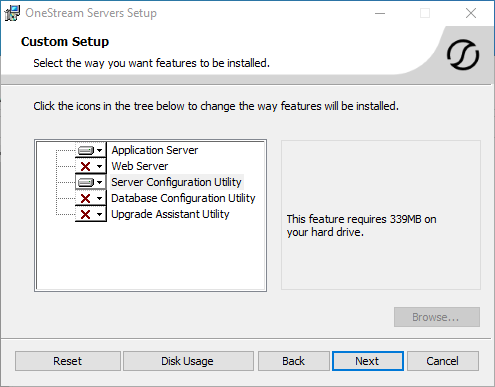
Re-Install OneStream Servers on an Application Server
This is the primary installation package that performs a complete server setup, including the web server, application server and all utilities. You can perform a custom install to choose the appropriate server components.
-
Browse to the OneStream Servers package, right-click OneStreamServers-#.msi and select Install to run the server installation.
-
Click Next on the landing page and accept the License Agreement.
-
Specify the directory where the software was previously installed and click Next.
-
Select Custom.
-
On Select Features, choose Application Server and Server Configuration Utility and click Next.
NOTE: Choose the Database Configuration Utility and Upgrade Assistant Utility if the application server is the server where the Database Configuration Utility was previously installed.
-
Click Install then Finish.
Re-Install OneStream Servers on a Web Server
-
Browse to the OneStream Servers package, right-click OneStreamServers-#.msi and select Install.
-
Click Next and accept the License Agreement.
-
Specify the directory where the software was previously installed and click Next.
-
Select Custom.
-
On Select Features, choose Web Server and Server Configuration Utility and click Next.

-
Click Install then Finish.
Re-Install OneStream for Desktop
-
Browse to the OneStream package, right-click OneStreamDesktop-#.msi and select Install.
-
Click Next and accept the License Agreement.
-
Select Custom.
-
Select the directory where the software was previously installed and click Next.
-
On Select Features, select all options and click Next.
-
Click Install then Finish.
Upgrade the Framework and Application Databases
Changes are made to stage tables for this release, so the database update may take time.
-
Before performing these steps, have a database administrator back up all OneStream databases.
-
On the OneStream application server with the OneStream Database Configuration Utility installed, select Start > Programs > OneStream Software > OneStream Database Configuration Utility.
-
Right-click the utility and select Run as Administrator.
-
Right-click OneStream Framework Database and choose Upgrade Database Version. If disabled, an upgrade is not required.
NOTE: If you get an error, check the log for details: C:\Program Files\OneStream Software\XFDatabaseConfig\Log
-
A dialog box displays giving you the option to process the schema upgrade on the database or the server. Leave the text field blank and click Yes to begin the database upgrade using the default setting, which is database.

-
When complete, confirm the upgrade.
-
Repeat the upgrade for each Application database and the Framework database until the option is disabled. This indicates the database is up-to-date.
Run the Upgrade Assistant Utility
Guidance for self-hosted environments
This is an additional step for when upgrading from a Platform Release pre 8.0 to a Platform Release 8.0 or later and must be performed. Specifically, this version of the Upgrade Assistant Utility will convert any legacy reports that were stored in CodeDOM format to now be stored as XML.
-
On the OneStream application server with the OneStream Upgrade Assistant Utility installed, select Start > Programs > OneStream Software > OneStream Upgrade Assistant Utility.
-
From the command line enter:
xfupgradeassistant -c C:\OneStreamShare\Config\XFAppServerConfig.xml -t ReportLayoutBytes -v -updateNOTE: C:\OneStreamShare\Config is the default path to the configuration file. You must update this path if it has been modified for your environment.
-
Enter exit to close the utility.
-
Restart IIS.
Update the ASP.NET Configuration File
The ASP.NET Configuration file (appsettings.json) must be updated on every server / folder as outlined below:
-
Application server
-
C:\Program Files\OneStream Software\OneStreamAppRoot\OneStreamApp\appsettings.json
-
C:\Program Files\OneStream Software\OneStreamAppRoot\OneStreamMgmt\appsettings.json
-
-
Web servers:
-
C:\Program Files\OneStream Software\OneStreamWebRoot\OneStreamWeb\appsettings.json
-
C:\Program Files\OneStream Software\OneStreamWebApiRoot\OneStreamWebApi\appsettings.json
-
C:\Program Files\OneStream Software\OneStreamWebUIRoot\OneStreamWebUI\appsettings.json
-
-
On each OneStream server, launch the OneStream Server Configuration Utility by clicking Start > Programs > OneStream Software > Server Configuration Utility.
-
Right-click the utility and select Run as Administrator.
-
Choose File > Open ASP.NET Configuration File and browse to the appropriate location from the folders above.
-
Select the appsettings.json file.
-
When the file opens, copy the directory path of the configuration files.
NOTE: This path is commonly set to C:\OneStreamShare\Config
-
Enable HTTP and Enable HTTPS are enabled by default.
NOTE: Clear Enable HTTP when SSL is enabled or clear Enable HTTPS when SSL is not enabled.
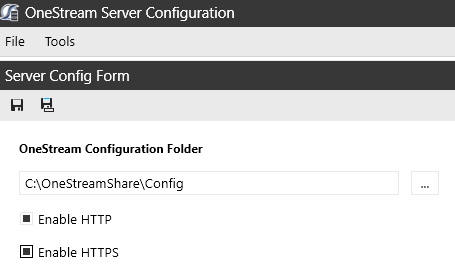
NOTE: For the WebUI server file for the Modern Browser Experience and the WebApi server file, a configuration file is not saved to the OneStreamShare folder, and you are not asked to select a checkbox to enable HTTP or HTTPS.
-
Save and close the file.
-
Repeat these steps on each web and app server in the environment.
Generate Pass-Thru Stubs in the Web Server Configuration File
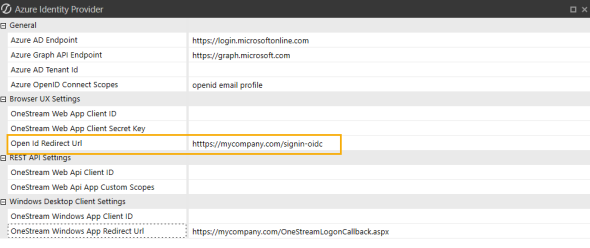
OpenIdRedirectUrl helps to configure OpenId Connect protocol redirects and cookies so that authentication works properly when application server is hosted under non-root virtual path and is behind reverse proxy. The OpenIdRedirectUrl value must have fully qualified domain name of the site and “/signin-oidc” path. See the example below.
<!-- XFWebServerConfig.xml -->
<OneStreamXF>
 <WebServerConfigSettings>
 <SSOSettings>
 <OpenIdIdentityProvider>
 <OpenIdRedirectUri>enter signin url</OpenIdRedirectUri>
 </OpenIdIdentityProvider>
 </SSOSettings>
 </WebServerConfigSettings>
</OneStreamXF>
To update the Open Id Redirect Url perform the following:
-
Open the Web Server Configuration File.
-
Open the Single Sign On Identity Provider.

-
Go to Identity Provider Specific Settings and select your provider. In this example, Azure Identity Provider is selected.

-
Paste the Open Id Redirect Url from the XML code snippet under Open Id Redirect Url.
-
Paste the OneStream Windows App Redirect UrI.
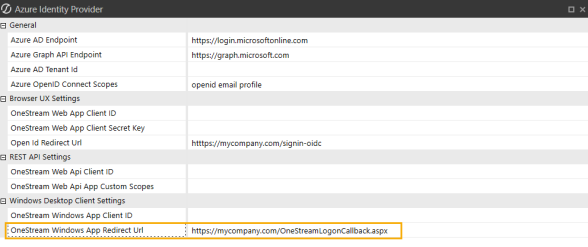
IMPORTANT: The Open Id Redirect UrL and OneStream Windows App Redirect UrI cannot be the same.
-
Click OK twice.
-
Click Save.
Update the Configuration Files
-
Open the Application Server Configuration file from C:\OneStreamShare\Config in a text editor and select Save.
-
Open the OneStream Server Configuration Utility, Run as Administrator.
-
Select File > Open and select the file from C:\OneStreamShare\Config. In Database Server Connections, select the ellipsis and update the command time-outs for the OneStream Database Server connection:
Short = 90 *must do
Large =900 (minimum or 900)
-
Select File > Save and close the file.
-
Repeat these steps for the Web Server Configuration file.
Update and Configure IIS
-
On each OneStream server, open the OneStream Server Configuration Utility by clicking Start > Programs > OneStream Software > Server Configuration Utility.
-
Right-click the utility and select Run as Administrator.
-
Choose Tools > Configure IIS.
-
In Configure IIS, specify the following:
-
For Web Site Name, enter the name of the OneStream IIS Website to update.
-
The OneStream App Server, and Web Server sites.
-
-
Select Update IIS Default Settings.
-
Select options to update IIS for the appropriate websites:
-
Use Web Server Settings: Specify the Web Server site.
-
Use App Server Settings: Specify the App Server site.
-
User Account Type: Specify Custom Account, then enter the user name and password of the OneStream Service account.
-
-
Click Update IIS Settings then OK.
-
Repeat these steps to set the appropriate IIS settings for the application pools in IIS.
-
Logon to each OneStream Web Server in the environment.
-
Browse to C:\Program Files\OneStream Software\OneStreamWebRoot\OneStreamWeb
-
Locate the OneStreamWeb.runtimeconfig.json file and open this file in a text editor.
-
Update the Config Properties section with the following line:
"System.Threading.ThreadPool.MinThreads": 128
Copy"configProperties": {
"System.GC.Server": true,
"System.Reflection.Metadata.MetadataUpdater.IsSupported": false,
"System.Runtime.Serialization.EnableUnsafeBinaryFormatterSerialization": false,
"System.Threading.ThreadPool.MinThreads": 128
}
NOTE: Be sure to place a comma ahead of the previous line as shown above.
-
Save the file for the change to take effect
-
Click Reset IIS.
Test the Windows Client Login Using ClickOnce
-
Using the Microsoft Edge Web Browser, navigate to the OneStream Windows App URL:
-
On Prem: http://<webserver>:50001/OneStreamWeb
-
Cloud: https://<customer>.onestreamcloud.com/OneStreamWeb
-
Click Open to launch the ClickOnce Windows app.
-
Confirm that you can log in.
-
From Application, select System Administration then click Connect.
-
Select System > Tools > Environment to identify the application servers and their status.
-
Verify that each server is active.
Test the Browser Experience Login
-
Navigate to the OneStream Browser Experience URL:
-
On Prem for Browser Experience: http://<webserver>:50001
-
Cloud for Browser Experience https://<customer>.onestreamcloud.com
-
Confirm that you can log in.
Verify the Application
-
Compile all business rules, ensure to:
-
Right-click the grid and export any errors for analysis using an Excel file format.
-
Apply updates as needed.
-
-
Download and import the Standard Application and Standard System Reports from the Solution Exchange.


